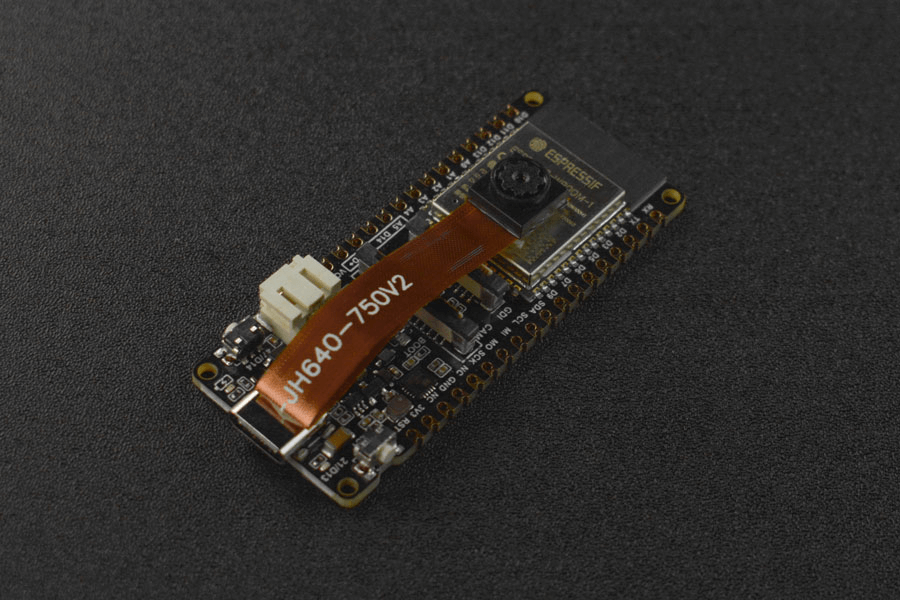
StyleTransferCam - Style Transfer Camera based on ESP32-S3
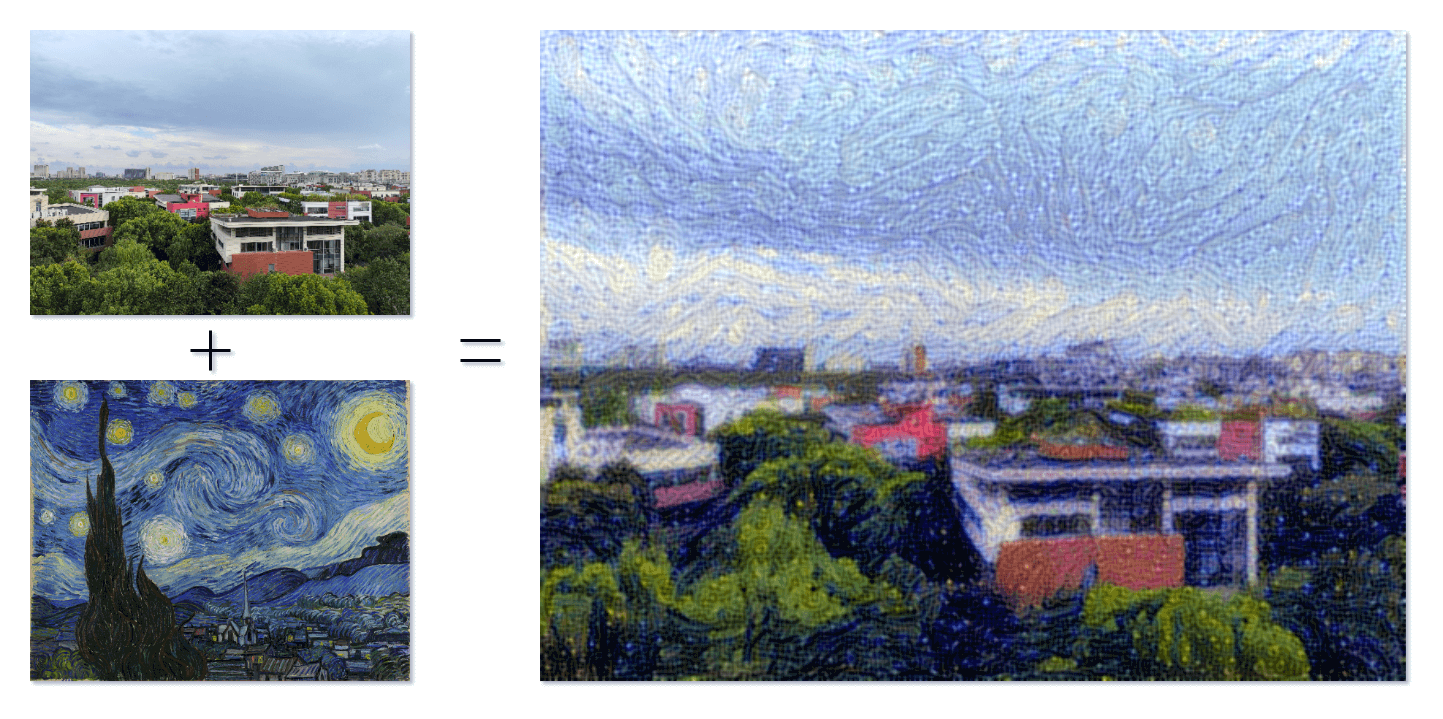
When art and technology converge, a new world unfolds before us. It is a visual feast and an exploration of infinite possibilities. StyleTransferCam is a style transfer camera based on ESP32-S3. It uses a machine learning technique called "style transfer". When you press the onboard button, it captures the current scene and blends it with a preset style template photo (such as Van Gogh's "Starry Night") to create a unique and artistic masterpiece.
StyleTransferCam consists of the following processes:
- Press the onboard button - take a photo - upload it to a backend server (which can be a PC or an old smartphone).
- Automatically start a Python program for style transfer, process the photo, and output a stylized image.
- If the ESP32-S3 is equipped with a TFT screen, it can also display the stylized image.
Test Onboard Button and LED
First, there is a simple Arduino program to test if the onboard button and LED are functioning properly. The program sets up a hardware interrupt to capture the button press event, and the LED lights up for half a second before automatically turning off.
#define ONBOARD_KEY 47  // Onboard button
#define ONBOARD_LED 21  // Onboard LED

volatile bool buttonPressed = false;  // Button falling edge interrupt flag

void setup() {
  pinMode(ONBOARD_LED, OUTPUT);
  pinMode(ONBOARD_KEY, INPUT);
  Serial.begin(115200);
  attachInterrupt(digitalPinToInterrupt(ONBOARD_KEY), buttonInterrupt, FALLING);
}

void loop() {
  if (buttonPressed) {
    digitalWrite(ONBOARD_LED, HIGH);
    delay(500);
    digitalWrite(ONBOARD_LED, LOW);
    Serial.println("buttonPressed");
    buttonPressed = false;  // Reset interrupt flag
  }
}

void buttonInterrupt() {
  buttonPressed = true;  // Set falling edge interrupt flag
}
Capture and Upload Photos with Button
Next, we will write an Arduino program to use the onboard button to control the ESP32-S3 to capture a photo and upload it to a specified network location. The network location is set in the code as serverName = "http://192.168.31.2:9000/upload", which needs to be modified to the address of your backend server. We are using a backend Python file upload service (which will be explained in the following steps), and here you need to modify it to the IP address of the machine running this service. (9000 and /upload are set in the receive-photo.py program later in this document)
#include "esp_camera.h"
#include <WiFi.h>
#include <HTTPClient.h>

// Server address for photo upload
const char *serverName = "http://192.168.31.2:9000/upload";
// // WARNING!!! PSRAM IC required for UXGA resolution and high JPEG quality // Ensure ESP32 Wrover Module or other board with PSRAM is selected // Partial images will be transmitted if image exceeds buffer size // // You must select partition scheme from the board menu that has at least 3MB APP space. // Face Recognition is DISABLED for ESP32 and ESP32-S2, because it takes up from 15 // seconds to process single frame. Face Detection is ENABLED if PSRAM is enabled as well
// =================== // Select camera model // ===================
define PWDN_GPIO_NUM -1
define RESET_GPIO_NUM -1
define XCLK_GPIO_NUM 45
define SIOD_GPIO_NUM 1
define SIOC_GPIO_NUM 2
define Y9_GPIO_NUM 48
define Y8_GPIO_NUM 46
define Y7_GPIO_NUM 8
define Y6_GPIO_NUM 7
define Y5_GPIO_NUM 4
define Y4_GPIO_NUM 41
define Y3_GPIO_NUM 40
define Y2_GPIO_NUM 39
define VSYNC_GPIO_NUM 6
define HREF_GPIO_NUM 42
define PCLK_GPIO_NUM 5
define ONBOARD_KEY 47 // Onboard button
define ONBOARD_LED 21 // Onboard LED
volatile bool buttonPressed = false; // Button falling edge interrupt flag
include "DFRobot_AXP313A.h"
DFRobot_AXP313A axp;
// =========================== // Enter your WiFi credentials // =========================== const char ssid = "WiFi_SSID"; const char *password = "*****";
void startCameraServer();
void setup()
{
  pinMode(ONBOARD_KEY, INPUT);
  pinMode(ONBOARD_LED, OUTPUT);
  attachInterrupt(digitalPinToInterrupt(ONBOARD_KEY), buttonInterrupt, FALLING);
  Serial.begin(115200);
  Serial.setDebugOutput(true);
  Serial.println();
  while (axp.begin() != 0)
  {
    Serial.println("init error");
    delay(1000);
  }
  axp.enableCameraPower(axp.eOV2640); // Set camera power
  camera_config_t config;
  config.ledc_channel = LEDC_CHANNEL_0;
  config.ledc_timer = LEDC_TIMER_0;
  config.pin_d0 = Y2_GPIO_NUM;
  config.pin_d1 = Y3_GPIO_NUM;
  config.pin_d2 = Y4_GPIO_NUM;
  config.pin_d3 = Y5_GPIO_NUM;
  config.pin_d4 = Y6_GPIO_NUM;
  config.pin_d5 = Y7_GPIO_NUM;
  config.pin_d6 = Y8_GPIO_NUM;
  config.pin_d7 = Y9_GPIO_NUM;
  config.pin_xclk = XCLK_GPIO_NUM;
  config.pin_pclk = PCLK_GPIO_NUM;
  config.pin_vsync = VSYNC_GPIO_NUM;
  config.pin_href = HREF_GPIO_NUM;
  config.pin_sscb_sda = SIOD_GPIO_NUM;
  config.pin_sscb_scl = SIOC_GPIO_NUM;
  config.pin_pwdn = PWDN_GPIO_NUM;
  config.pin_reset = RESET_GPIO_NUM;
  config.xclk_freq_hz = 20000000;
  config.frame_size = FRAMESIZE_UXGA;   // Photo resolution. Default is FRAMESIZE_UXGA
  config.pixel_format = PIXFORMAT_JPEG; // for streaming
  // config.pixel_format = PIXFORMAT_RGB565; // for face detection/recognition
  config.grab_mode = CAMERA_GRAB_WHEN_EMPTY;
  config.fb_location = CAMERA_FB_IN_PSRAM;
  config.jpeg_quality = 0; // 63; // Photo quality. Default is 12
  config.fb_count = 1;

  /*
  FRAMESIZE_QVGA (320 x 240)
  FRAMESIZE_CIF (352 x 288)
  FRAMESIZE_VGA (640 x 480)
  FRAMESIZE_SVGA (800 x 600)
  FRAMESIZE_XGA (1024 x 768)
  FRAMESIZE_SXGA (1280 x 1024)
  FRAMESIZE_UXGA (1600 x 1200)
  */
}
// if PSRAM IC present, init with UXGA resolution and higher JPEG quality
//                      for larger pre-allocated frame buffer.
if (config.pixel_format == PIXFORMAT_JPEG)
{
  if (psramFound())
  {
    config.jpeg_quality = 0; // 63; // Photo quality. Default is 10 here
    config.fb_count = 2;
    config.grab_mode = CAMERA_GRAB_LATEST;
  }
  else
  {
    // Limit the frame size when PSRAM is not available
    config.frame_size = FRAMESIZE_UXGA; // Photo resolution. Default is FRAMESIZE_SVGA here
    config.fb_location = CAMERA_FB_IN_DRAM;
  }
}
else
{
  // Best option for face detection/recognition
  config.frame_size = FRAMESIZE_UXGA; // FRAMESIZE_240X240;
#if CONFIG_IDF_TARGET_ESP32S3
  config.fb_count = 2;
#endif
}

#if defined(CAMERA_MODEL_ESP_EYE)
  pinMode(13, INPUT_PULLUP);
  pinMode(14, INPUT_PULLUP);
#endif

// camera init
esp_err_t err = esp_camera_init(&config);
if (err != ESP_OK)
{
  Serial.printf("Camera init failed with error 0x%x", err);
  return;
}

sensor_t *s = esp_camera_sensor_get();
// initial sensors are flipped vertically and colors are a bit saturated
if (s->id.PID == OV3660_PID)
{
  s->set_vflip(s, 1);       // flip it back
  s->set_brightness(s, 1);  // increase the brightness just a bit
  s->set_saturation(s, -2); // decrease the saturation
}
// drop down frame size for higher initial frame rate
if (config.pixel_format == PIXFORMAT_JPEG)
{
  s->set_framesize(s, FRAMESIZE_QVGA);
}

#if defined(CAMERA_MODEL_M5STACK_WIDE) || defined(CAMERA_MODEL_M5STACK_ESP32CAM)
  s->set_vflip(s, 1);
  s->set_hmirror(s, 1);
#endif

#if defined(CAMERA_MODEL_ESP32S3_EYE)
  s->set_vflip(s, 1);
#endif

WiFi.begin(ssid, password);
WiFi.setSleep(false);
while (WiFi.status() != WL_CONNECTED)
{
  delay(500);
  Serial.print(".");
}
Serial.println("");
Serial.println("WiFi connected");

startCameraServer();

Serial.print("Camera Ready! Use 'http://");
Serial.print(WiFi.localIP());
Serial.println("' to connect");
digitalWrite(ONBOARD_LED, LOW);
}

void loop()
{
  // Do nothing. Everything is done in another task by the web server
  // delay(10000);

  // Logic after button press
  if (buttonPressed)
  {
    digitalWrite(ONBOARD_LED, HIGH);
    delay(300);
    digitalWrite(ONBOARD_LED, LOW);

    // Take a photo
    camera_fb_t *fb = esp_camera_fb_get();
    if (!fb)
    {
      Serial.println("Failed to get camera frame buffer");
      return;
    }

    // Create an HTTP client
    HTTPClient http;

    // Upload the photo to the server
    http.begin(serverName);
    http.addHeader("Content-Type", "image/jpeg");
    int httpResponseCode = http.POST(fb->buf, fb->len);
    if (httpResponseCode > 0)
    {
      Serial.printf("Photo uploaded successfully, server response code: %d\n", httpResponseCode);

      // Blink LED to indicate successful upload
      digitalWrite(ONBOARD_LED, HIGH);
      delay(300);
      digitalWrite(ONBOARD_LED, LOW);
    }
    else
    {
      Serial.printf("Failed to upload photo, error code: %s\n", http.errorToString(httpResponseCode).c_str());
    }
    http.end();

    // Release frame buffer
    esp_camera_fb_return(fb);

    // delay(1000); // Wait for 1 second before taking another photo and uploading

    buttonPressed = false; // Reset interrupt flag
  }
}

void buttonInterrupt()
{
  buttonPressed = true; // Set falling edge interrupt flag
}
Receiving Photo Uploads
Here we use the Flask library in Python to build an HTTP server that can receive photo uploads.
from flask import Flask, request
import subprocess

app = Flask(__name__)

@app.route('/upload', methods=['POST'])
def upload():
    try:
        image = request.data
Save the photo to the specified directory
    with open('base.png', 'wb') as f:
        f.write(image)
    print("Photo saved, rendering...")
    # Launch the python script for style transfer
    subprocess.run(['python', './style_transfer.py'])

    return "Photo uploaded successfully", 200
except Exception as e:
    print("Failed to upload photo:", str(e))
    return "Failed to upload photo", 500
if name == 'main': app.run(host='0.0.0.0', port=9000)
Don't rush to run the program yet. `style_transfer.py` is the program for style transfer, which will be shown in the next step. The logic of this program is that if the photo sent back by ESP32-S3 is successfully received, it will automatically launch the script for style transfer using `subprocess`.
Please note that if the program encounters an exception and prompts that the port is occupied, you can try changing `port=9000` to a different value.
## Program for Style Transfer
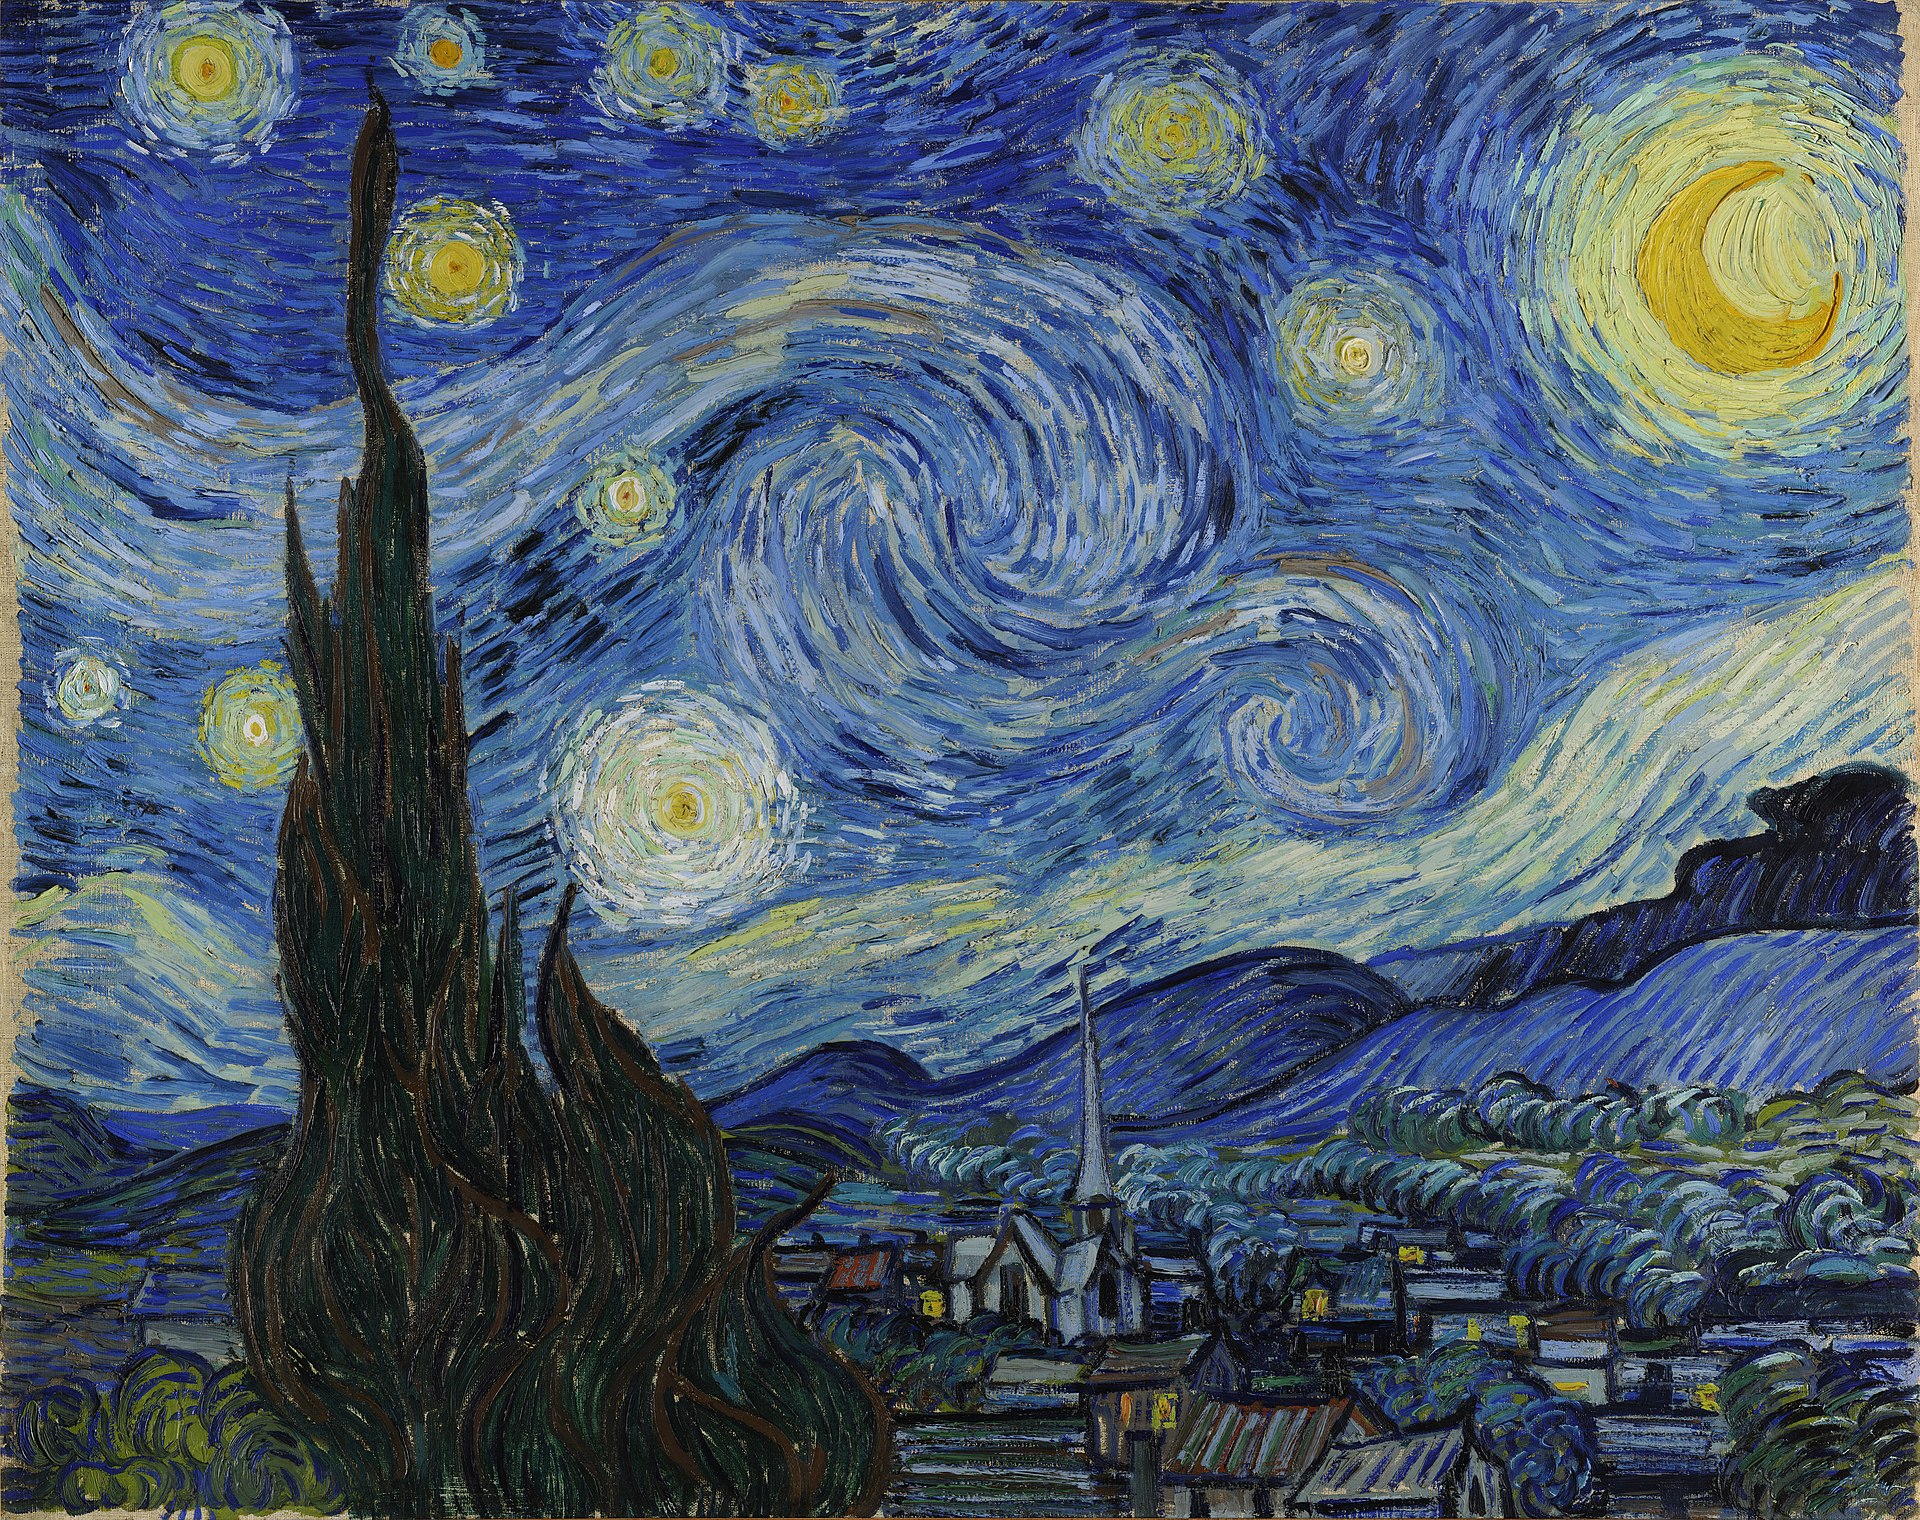
In the same directory as `receive-photo.py`, we use TensorFlow to write a Python program for style transfer. First, install the dependencies required by the program (due to the network environment in China, it is difficult to download TensorFlow, so you need to be patient), and then prepare a photo to be stylized in the same directory, and name it `base.png`; and a style reference image, named `style_reference.png`. This image can be an artwork, such as Van Gogh's "Starry Night":
Next, write the program for style transfer:
```python title="style_transfer.py"
from IPython.display import Image, display
import numpy as np
import tensorflow as tf
from tensorflow import keras
from tensorflow.keras.applications import vgg19
base_image_path = "./base.png" # Path to the image to be stylized
style_reference_image_path = "./style_reference.png" # Path to the style reference image
result_prefix = "img_generated"
# Weight settings for each loss component
total_variation_weight = 1e-6
style_weight = 1e-6
content_weight = 2.5e-8
# Dimensions of the generated image
width, height = keras.preprocessing.image.load_img(base_image_path).size
img_nrows = 400
img_ncols = int(width * img_nrows / height)
# View the base image and style reference image for style transfer using the following command
display(Image(base_image_path))
display(Image(style_reference_image_path))
# Image preprocessing
```python
def preprocess_image(image_path):
# Use Keras library functions to open the image, resize it, and format it into the appropriate tensor
img = keras.preprocessing.image.load_img(
image_path, target_size=(img_nrows, img_ncols)
)
img = keras.preprocessing.image.img_to_array(img)
img = np.expand_dims(img, axis=0)
img = vgg19.preprocess_input(img)
return tf.convert_to_tensor(img)
def deprocess_image(x):
# Use the function to convert the tensor back into a valid image
x = x.reshape((img_nrows, img_ncols, 3))
# Remove zero center by subtracting average pixels
x[:, :, 0] += 103.939
x[:, :, 1] += 116.779
x[:, :, 2] += 123.68
# 'BGR'->'RGB'
x = x[:, :, ::-1]
x = np.clip(x, 0, 255).astype("uint8")
return x
# Gram matrix of image tensor (product of feature matrix and its transpose)
def gram_matrix(x):
x = tf.transpose(x, (2, 0, 1))
features = tf.reshape(x, (tf.shape(x)[0], -1))
gram = tf.matmul(features, tf.transpose(features))
return gram
# "Style loss" aims to preserve the style of the reference image in the generated image.
# It is based on the gram matrix (style extraction) from the style reference image
# and the feature maps from the image generated from it.
def style_loss(style, combination):
S = gram_matrix(style)
C = gram_matrix(combination)
channels = 3
size = img_nrows * img_ncols
return tf.reduce_sum(tf.square(S - C)) / (4.0 * (channels ** 2) * (size ** 2))
# The auxiliary loss function is designed to maintain the content of the base image in the generated image.
def content_loss(base, combination):
return tf.reduce_sum(tf.square(combination - base))
# The third loss function is the total variation loss,
# designed to keep the generated image locally coherent.
def total_variation_loss(x):
a = tf.square(
x[:, : img_nrows - 1, : img_ncols - 1, :] - x[:, 1:, : img_ncols - 1, :]
)
b = tf.square(
x[:, : img_nrows - 1, : img_ncols - 1, :] - x[:, : img_nrows - 1, 1:, :]
)
return tf.reduce_sum(tf.pow(a + b, 1.25))
# Next, let's create a feature extraction model that retrieves the intermediate activations of VGG19 (made into a dictionary based on the names).
# Replace with the path to the weight file you downloaded locally
weights_path = "./dependencies/vgg19_weights_tf_dim_ordering_tf_kernels_notop.h5"
Build a VGG19 model with pre-trained ImageNet weights
model = vgg19.VGG19(weights=weights_path, include_top=False)
Get symbolic outputs of each "key" layer (we gave them unique names)
outputs_dict = dict([(layer.name, layer.output) for layer in model.layers])
Build a model that returns the activation values of each layer in VGG19 (as a dictionary)
feature_extractor = keras.Model(inputs=model.inputs, outputs=outputs_dict)
Finally, here is the code to compute the style transfer loss.
List of layers for style loss
style_layer_names = [ "block1_conv1", "block2_conv1", "block3_conv1", "block4_conv1", "block5_conv1", ]
Layer for content loss
content_layer_name = "block5_conv2"
def compute_loss(combination_image, base_image, style_reference_image): input_tensor = tf.concat( [base_image, style_reference_image, combination_image], axis=0 ) features = feature_extractor(input_tensor)
# Initialize loss
loss = tf.zeros(shape=())

# Add content loss
layer_features = features[content_layer_name]
base_image_features = layer_features[0, :, :, :]
combination_features = layer_features[2, :, :, :]
loss = loss + content_weight * content_loss(
    base_image_features, combination_features
)
# Add style loss
for layer_name in style_layer_names:
    layer_features = features[layer_name]
    style_reference_features = layer_features[1, :, :, :]
    combination_features = layer_features[2, :, :, :]
    sl = style_loss(style_reference_features, combination_features)
    loss += (style_weight / len(style_layer_names)) * sl

# Add total variation loss
loss += total_variation_weight * total_variation_loss(combination_image)
return loss
Add tf.function decorator to the loss computation and gradient computation for faster execution during compilation.
@tf.function
def compute_loss_and_grads(combination_image, base_image, style_reference_image):
with tf.GradientTape() as tape:
loss = compute_loss(combination_image, base_image,
style_reference_image)
grads = tape.gradient(loss, combination_image)
return loss, grads
# Perform batch gradient descent steps repeatedly to minimize the loss as much as possible and save the generated image every 100 iterations.
# Reduce the learning rate by 0.96 every 100 steps.
optimizer = keras.optimizers.SGD(
keras.optimizers.schedules.ExponentialDecay(
initial_learning_rate=100.0, decay_steps=100, decay_rate=0.96
)
)
base_image = preprocess_image(base_image_path)
style_reference_image = preprocess_image(style_reference_image_path)
combination_image = tf.Variable(preprocess_image(base_image_path))
iterations = 4000
for i in range(1, iterations + 1):
loss, grads = compute_loss_and_grads(
combination_image, base_image, style_reference_image
)
optimizer.apply_gradients([(grads, combination_image)])
if i % 100 == 0:
print("Iteration %d: loss=%.2f" % (i, loss))
img = deprocess_image(combination_image.numpy())
fname = result_prefix + "_at_iteration_%d.png" % i
keras.preprocessing.image.save_img(fname, img)
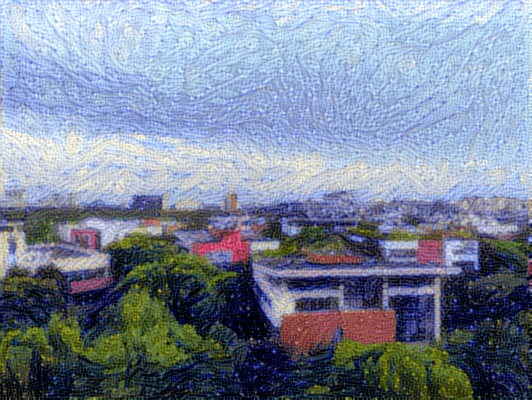
# After 4000 iterations, the output result is:
display(Image(result_prefix + "_at_iteration_4000.png"))
Now, you can try running this Python program separately. If the program does not report any errors, wait for a while (the specific time depends on the performance of your computer), and you will find the stylized photo after the iterative style transfer in the current directory.
If this program runs successfully, you can directly run receive-photo.py to receive photos taken by ESP32-S3 and generate stylized photos automatically.
References and Acknowledgements
Title
Original: https://wiki-power.com/
Introduction
This post is protected by CC BY-NC-SA 4.0 agreement, should be reproduced with attribution.
This post is translated using ChatGPT, please feedback if any omissions.